Last Updated on 2026-07-08 by Dr.Wall
SurfShark is a powerful VPN service built on top-tier encryption protocols, originally designed for strong privacy and data protection in the US and Europe. It has since become a favorite worldwide for its exceptional performance, reliability, and value. In this in-depth guide, I share my real-world testing results and walk you through everything you need to know, step by step:
Where Surfshark fits in the VPN stack
Positioning: multi-device household option.
Surfshark should not be sold as the same thing as StrongVPN or ExpressVPN. Its cleanest angle is device flexibility: phones, tablets, laptops, family members, travel devices and streaming boxes. It belongs in comparison tables when the reader has many devices to cover.
- families and multi-device users
- people who want one account across phones, laptops and tablets
- readers comparing value across many devices
- readers who only need one cheap backup
- users who want the strongest premium travel pitch
- restrictive-network users who do not have a second VPN ready
Quick VPN choice: price, speed and real use first
Surfshark makes the most sense when one plan needs to cover many devices, phones, laptops and family use.
Dr.Wall note: check today's speed image, the annual price, refund terms and the device you actually use before clicking a deal.
US$54/year, about US$4.50/month ExpressVPN
premium travel, World Cup and tough networks Surfshark
many devices, family and mobile use FlowVPN
3-day trial and backup route
- Surfshark’s Key Advantages & Features
- How to Get the Best Surfshark Deals & Discounts
- Surfshark Windows Installation Guide
- Surfshark Mac Installation Guide
- Surfshark Android Installation Guide
- Surfshark iPhone (iOS) Installation Guide
- Surfshark Speed Test Results
- Common Surfshark Connection Issues & Fixes
Surfshark’s Key Advantages & Features
Unlimited Simultaneous Connections Surfshark stands out with no device limit — you can connect as many phones, tablets, laptops, desktops, routers, and even smart TVs as you want under one single subscription. This makes it perfect for families, households, or anyone who owns multiple devices and wants full protection everywhere without extra costs.
Unlimited devices · Automatic protocol switching · 30-day money-back guarantee
Surfshark: High-Quality VPN at a Competitive Price
Company Overview:
Founded in 2018 and based in the British Virgin Islands, Surfshark has quickly risen to prominence in the VPN industry. Despite being a relatively new player, it has earned widespread praise from users and cybersecurity experts alike for its reliability and innovation.
Key Features:
Surfshark supports a variety of VPN protocols, including OpenVPN, IKEv2, and their custom implementation of Shadowsocks. It uses AES-256 encryption, the highest standard in the industry, and enforces a strict no-logs policy, ensuring your online activity remains private.
Servers & Locations:
Surfshark operates 3,200+ servers in over 60 countries, offering users excellent global coverage for fast speeds and easy access to geo-restricted content.
Device Compatibility:
One of Surfshark’s standout features is its unlimited simultaneous device connections—a rare offering among VPN providers. It supports all major platforms including Windows, macOS, iOS, Android, and Linux, as well as Fire TV, Apple TV, smart TVs, gaming consoles, and routers.
Customer Support:
Surfshark offers 24/7 customer service via live chat and email. Their website also features extensive tutorials and a helpful knowledge base.
Additional Features:
- CleanWeb: Blocks ads, trackers, and malware.
- Whitelister: A split tunneling feature allowing selected apps or websites to bypass the VPN.
- MultiHop: Routes your connection through two VPN servers for enhanced security and privacy.
Pricing & Refund Policy:
Surfshark offers highly competitive pricing and backs its plans with a 30-day money-back guarantee, letting you try it risk-free.
Conclusion:
Although a newer entrant in the market, Surfshark stands out by combining top-tier security, advanced features, and unlimited device connections at an affordable price. It's a strong contender against more established VPN providers and an excellent choice for users who prioritize both privacy and value.
Surfshark is one of the better-known consumer VPN brands, especially for households that need many devices on one subscription. Its strength is convenience: apps are easy to install, device limits are generous, and obfuscation-related settings can help in some restrictive network environments.
・Enjoy Fully Automated Server and Protocol Selection
No manual setup needed—Surfshark intelligently chooses the best server and protocol for your connection, ensuring optimal speed and reliability every time.
Surfshark offers obfuscation-related features for restrictive networks. Results can still vary by ISP, device and local network conditions, so it is best treated as a convenient, good-value option rather than a guaranteed fix for every connection problem.
Speed and Value Notes
Based on real-world testing, Surfshark delivers exceptional speed when connected through its SS nodes. In head-to-head comparisons, Surfshark outperforms many competitors in terms of latency, stability, and streaming capability for users on restrictive networks.
Surfshark Feature: Unlimited Devices
Unlike most VPN providers—such as StrongVPN, ExpressVPN, or FlowVPN—which typically cap simultaneous connections at 5 devices, Surfshark allows unlimited simultaneous connections. For most individuals, 5 devices may be sufficient to cover a phone, laptop, and tablet. However, if you plan to share your VPN with family members or stream content together on multiple devices (like watching Netflix as a group), that limit can quickly become restrictive. That’s where Surfshark truly stands out.
Why Choose Surfshark?
We believe Surfshark is one of the best VPNs available today for many reasons—but one of the most compelling is its support for unlimited devices under a single subscription. This means you can protect the entire household's online activities without worrying about hitting device limits.
Since Surfshark charges a flat monthly fee regardless of the number of connected devices, it offers outstanding value, especially when compared to VPNs that charge based on the number of users or connections.
In addition, Surfshark includes a wide range of premium features such as:
- Strict no-logs policy
- Military-grade AES-256 encryption
- Built-in ad and malware blocker (CleanWeb)
Even if you're not tech-savvy, Surfshark’s intuitive apps make it easy to stay protected across all your devices.
If you're looking for a VPN solution that keeps your entire family safe online—without limitations—Surfshark is your best choice.
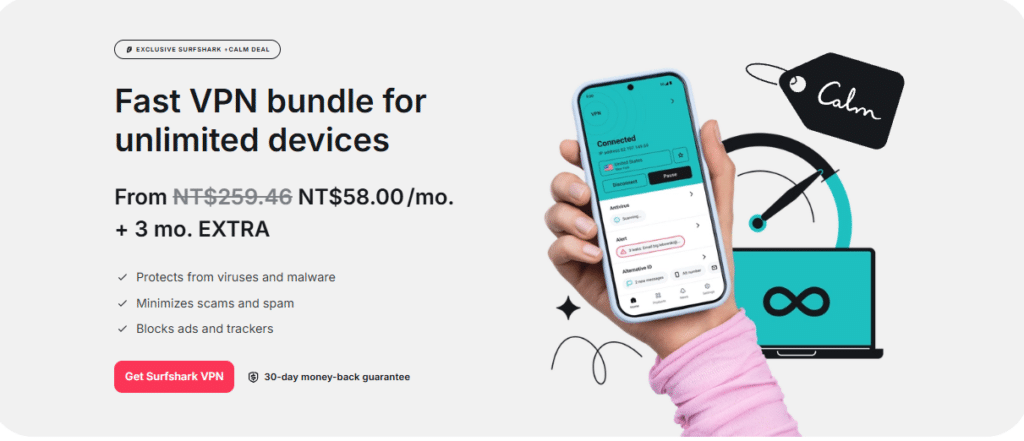
How to Get the Best Surfshark Deals & Discounts
Surfshark frequently releases exclusive promotions, especially for longer subscriptions (e.g., 24-month plans), which can bring the monthly price down significantly — often to around $2.49/month or lower with current offers. These deals are available directly through official affiliate links like the one below, and they usually include extra months free or big percentage discounts.
Step-by-Step Guide to Claim the Best Surfshark Offer
Step 1: Click the Exclusive Deal Link Use our special affiliate link to access Surfshark’s latest limited-time promotion. This ensures you get the best available discount (currently up to 81% off + extra months free on qualifying plans).
Step 2: Click “Get Surfshark” or “Buy Now” on the Official Site
Once on the Surfshark homepage or deal page, look for the prominent “Get Surfshark” or “Buy Now” button (usually highlighted in green or blue). Click it to start the checkout process.
Step 3: Choose Your Plan & Create an Account Select the subscription length that suits you (1-month, 12-month, or 24-month — longer plans give the biggest savings).
Enter a valid email address — this will be used to create and activate your account. No need for complex registration; it’s quick and straightforward.
Step 4: Select Payment Method
Surfshark supports a wide range of secure payment options, including:
- Credit/Debit Cards (Visa, Mastercard, etc.)
- PayPal
- Google Pay
- Amazon Pay
- Cryptocurrency (Bitcoin, etc.)
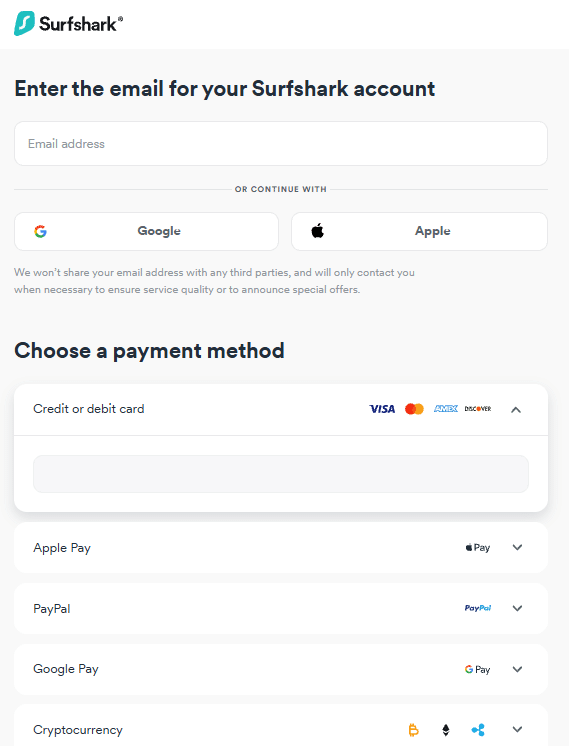
I personally use credit card for simplicity and fast processing. Complete the payment securely on the encrypted checkout page.
Step 5: Activate Your Account via Email
After successful payment, Surfshark will immediately send an activation email to the address you provided. Open the email, click the activation/confirmation link inside, and follow the prompts to set your password. Once done, your account is active — download the app for your device and start connecting!
Quick Tips
- The deal price ($2.49/month or similar) is usually locked in for the full subscription term (with auto-renewal at regular rate afterward).
- All plans come with a 30-day money-back guarantee — test risk-free.
- If the deal page shows a different price, refresh or try the link again; promotions can update frequently.
This process takes less than 5 minutes and gets you the lowest price available. If you run into any issues during signup, Surfshark’s live chat support is excellent and available 24/7.
Surfshark Installation Guide – Easiest Setup for All Devices (2026 Update)
Surfshark has one of the simplest installation processes among major VPNs. Once you download the installer or app, it's usually a one-click or few-click setup. Below are detailed, step-by-step guides for the most common platforms. General Installation Steps (Applies to Most Platforms)
Step 1: Log in to Your Surfshark Account Dashboard
Go to the official SurfShark website (surfshark.com) and log in with your credentials. Navigate to the “Downloads” or “Apps” section in your account dashboard. Select and download the client/app that matches your operating system (Windows, macOS, Android, iOS, etc.).

Step 2: Run the Installer
Double-click (or tap) the downloaded installation file/package. Follow the on-screen prompts — most setups are automatic and require just a few clicks (“Next” / “Install” / “Allow”).
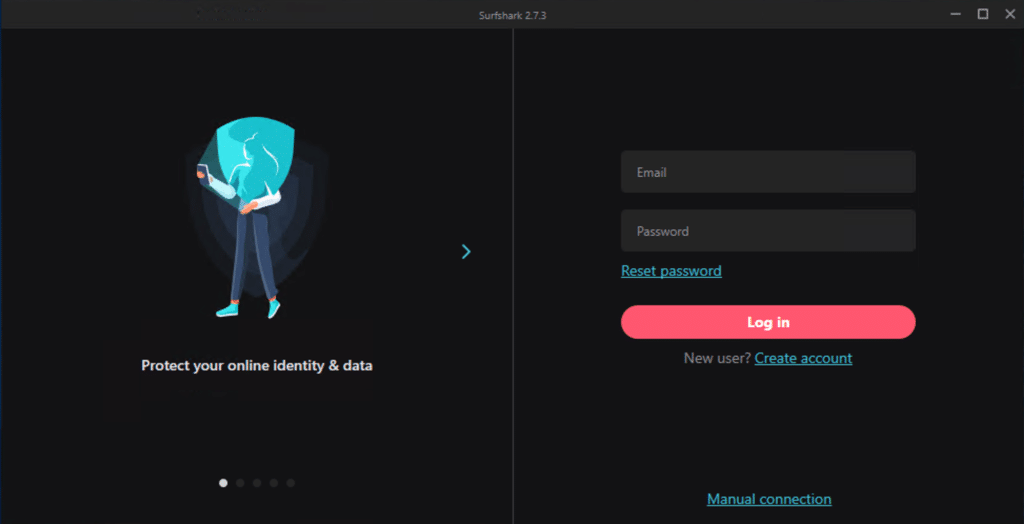
Step 3: Launch the App & Log In
After installation, the Surfshark app usually opens automatically. On the login screen, enter your email and password (the same ones used during signup). Click “Log In” — you're now ready to connect.
Surfshark Mac Installation Guide (macOS)
Here’s how to set up Surfshark VPN on macOS (works on macOS Ventura, Sonoma, Sequoia, etc.):
- Download from the App Store (Recommended) or Official Site
- Open the Mac App Store on your Mac.
- Search for “Surfshark VPN”.
- Or go directly via this link: Surfshark Mac App Store (or download from your account dashboard at surfshark.com).
- Click “Get” or “Download”: The app will download and install automatically (free to download; your subscription activates features).
- Open the App: Once installed, click “Open” in the App Store or find Surfshark in Launchpad/Applications folder.
- Log In: Enter the email and password you used when signing up. Click “Log In”.
- Connect to a Server: Click the big “Connect” button — Surfshark will automatically connect you to the fastest available server (usually the “Quick-connect” option). You can also manually select any server location from the list.
- Allow VPN Configuration (One-Time Prompt): The first time you connect, macOS will ask for permission to add VPN configurations. A pop-up will appear: Enter your Mac user password (the one you use to unlock your Mac). Click “Always Allow” or “OK” to grant permission. This is a standard security step — Surfshark needs it to create and manage the VPN tunnel.
- You’re Connected! The app will show “Connected” with the server location, IP address change, and data protection status. You can now browse securely, stream, or use any app with full encryption.
Tips for macOS Users
- Enable “Kill Switch” and “CleanWeb” (ad/malware blocker) in Settings for extra protection.
- If you prefer manual setup (advanced), Surfshark also supports WireGuard/OpenVPN config files from the dashboard.
- 30-day money-back guarantee applies — test without risk.
Surfshark Antivirus Installation Guide for macOS & Android (2026 Update)
Surfshark Antivirus is bundled with your Surfshark subscription (available in One or Surfshark One+ plans). It provides real-time protection, malware scanning, and web threat blocking. Note that after installing the main Surfshark app, Antivirus requires extra system permissions on macOS to function fully — the process is straightforward but involves granting access in System Settings.
How to Install & Enable Surfshark Antivirus on macOS
Before Antivirus works, you must complete the main app installation and grant permissions. Follow these steps:
- Download the Surfshark App for macOS: Go to the official Surfshark website (surfshark.com) and log in to your account. Navigate to the Downloads section and download the macOS installer (or get it directly from the Mac App Store for easier updates).
- Complete the Standard Installation: Open the downloaded .dmg file, drag Surfshark to Applications folder (or follow App Store prompts). Launch the Surfshark app and log in with your email and password.
- Access the Antivirus Tab: In the Surfshark app sidebar or main menu, go to the Antivirus tab (it may appear as “Surfshark Antivirus” or under “Surfshark One” features). Click Open System Preferences (or similar prompt like “Enable Antivirus”).
- Confirm the Initial Prompt: A pop-up will appear — click OK to proceed.
- Unlock System Settings: In the System Settings window that opens, click the lock icon in the bottom-left corner. Enter your Mac user password (or use Touch ID/Fing: erprint if set up). Click Unlock.
- Grant Permission: In the Privacy & Security section (or the specific prompt), find and check the box next to Surfshark Antivirus (or Surfshark app). Click Allow if prompted. Click the lock icon again to save and lock changes.
- Grant Full Disk Access (Required for Scanning): Open System Settings > Privacy & Security > Privacy tab. Scroll to Full Disk Access in the left sidebar. Click the lock icon again, enter your password to unlock. Check the box next to Surfshark Antivirus (or the Surfshark app if listed together). Click the lock to save.
- Finish & Scan: Return to the Surfshark app, go back to the Antivirus tab. Click Scan your device — it will now run a full system scan for malware, viruses, and threats. Enable real-time protection if desired (recommended for ongoing security).
How to Install Surfshark VPN App on Android (for Full Suite Access)
If you want to use Surfshark Antivirus alongside VPN on Android (note: Antivirus is primarily desktop-focused in Surfshark One, but VPN + CleanWeb provides mobile protection):
- Download from Google Play Open Google Play Store on your Android device. Search for “Surfshark VPN” (official app by Surfshark B.V.). Or use this direct link: Surfshark
- Install & Launch Tap Install — it downloads and installs automatically. Open the app once finished.
- Log In Enter your Surfshark email and password. Tap Log In.
- Connect & Enable Features Tap Quick-connect for the fastest server, or choose manually. For extra protection: Go to Settings > Features > Enable CleanWeb (blocks ads, trackers, malware on mobile). Antivirus full scanning is desktop-only, but this setup gives comprehensive mobile security.
Important Notes
- Surfshark Antivirus requires a Surfshark One or higher plan (VPN alone doesn’t include full Antivirus).
- macOS permissions are one-time — after granting, it runs smoothly.
- Always download from official sources to avoid fakes.
- 30-day money-back guarantee applies — test Antivirus risk-free.
Surfshark Android Installation Guide
- Here’s a simple step-by-step guide to install and set up Surfshark VPN on your Android device (phone, tablet, or Android TV – works on Android 7.0 and above, 2026 latest version):
- Open the Google Play Store Locate and launch the Play Store app from your home screen or app drawer.
- Search for Surfshark In the search bar at the top, type “Surfshark” or “Surfshark VPN”. Select the first official result (developed by Surfshark B.V.).
- Download and Install On the Surfshark VPN app page, tap Install (or Download). The app will download and install automatically in a few seconds to a minute. Once finished, the button changes to Open.
- Launch the App Tap Open directly from the Play Store, or find the Surfshark icon on your home screen/app drawer and tap to start it.
- Log In If you already have a Surfshark subscription, select Log In (or “Sign In”). Enter your registered email address and password. Tap Log In to access your account.
- Connect to VPN After logging in, tap the large blue Connect button in the center. Surfshark’s Smart Algorithm will automatically connect you to the fastest available server (Quick-connect feature). Once connected, you’ll see “Connected” status, the server location, your new IP, and protection details.
- Quick Tips for Android
- The first time you connect, Android may show a “Connection Request” pop-up – tap OK or Allow.
- Go to Settings > Features in the app to enable Kill Switch (prevents leaks if connection drops) and CleanWeb (blocks ads, trackers, malware).
- To choose a specific country or city, tap Locations at the bottom and browse the list.
Surfshark iPhone (iOS) Installation Guide
Follow these easy steps to install and configure Surfshark VPN on your iPhone or iPad (compatible with iOS 15+ / iPadOS, 2026 latest version):
- Open the App Store Find and launch the App Store from your home screen.
- Search for Surfshark Tap the search icon at the bottom, then type “Surfshark” or “Surfshark VPN” in the search bar. Press Search.
- Download and Install In the results, find Surfshark VPN (developer: Surfshark B.V.). Tap Get (or the cloud icon if previously downloaded). Authenticate with your Apple ID password, Face ID, or Touch ID if prompted.
- Open the App Once installed, tap Open in the App Store, or go back to your home screen and tap the Surfshark icon to launch it.
- Log In or Sign Up If you already have an account, tap Log In and enter your email and password. If you’re new, tap Sign Up and follow the on-screen instructions (but it’s recommended to buy from the website first for the best deals).
- Connect to VPN After logging in, tap the big Connect button. Surfshark will automatically connect to the fastest available server (Quick-connect). To select a specific location, tap Locations at the bottom and choose a country or city from the list.
- Allow VPN Configuration (One-Time Step) The first time you connect, iOS will show a pop-up: “VPN Configuration”. Tap Allow. Enter your iPhone/iPad unlock passcode (or use Face ID/Touch ID) to confirm. This is a standard iOS security requirement for any VPN app.
- You’re Connected & Ready The app will display “Connected”, the server info, your new IP address, and protection status. You can now browse, stream, or use apps securely.
Quick Tips for iOS
- Enable Kill Switch and CleanWeb in the app’s Settings for maximum protection.
- If the interface changes slightly due to iOS updates, Surfshark’s in-app help or support chat is 24/7.
- All plans include a 30-day money-back guarantee – test freely.
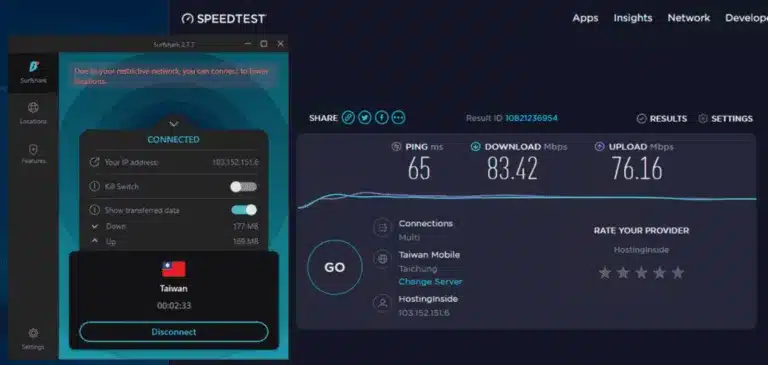
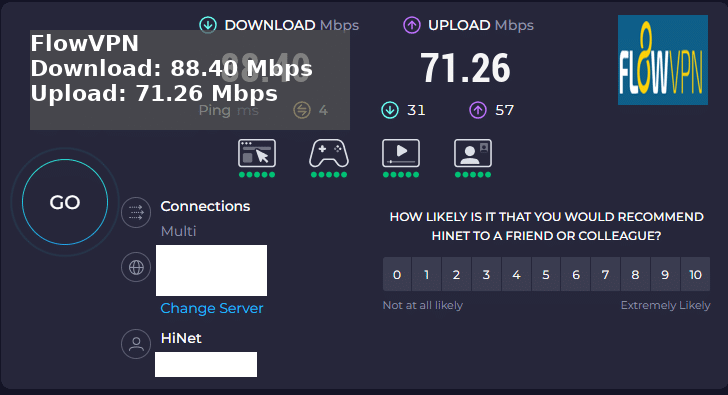
Surfshark Speed Test Results – Real-World Performance (2026 Update)
Unlike many review sites that overhype VPNs with exaggerated claims, I conducted hands-on speed tests with Surfshark myself. The results show Surfshark delivers excellent real-world performance, often outperforming even premium competitors like ExpressVPN in everyday use.
While it's not as specialized as some ultra-fast protocols designed purely for high-bandwidth tasks, Surfshark handles demanding activities with ease — including 4K streaming, live media broadcasts, online gaming, large downloads, and video calls — without noticeable buffering or lag.
Key Test Highlights
- Download Speed: Up to 83 Mbps (very consistent across multiple servers and locations)
- Upload Speed: Up to 76 Mbps (great for uploading videos, cloud backups, or video conferencing)
These speeds were measured on a standard home connection (base speed around 100–150 Mbps), using Surfshark's WireGuard protocol, which is the fastest option in the app. Actual results can vary based on your ISP, location, chosen server, time of day, and network congestion, but Surfshark consistently ranks among the top for minimal speed loss (often under 10–20% reduction).
Why Surfshark Excels in Speed
- WireGuard Protocol – Built-in and default for most connections; it's lightweight, secure, and significantly faster than older protocols like OpenVPN.
- Smart Algorithm – Automatically picks the fastest server for your location.
- Unlimited Bandwidth – No throttling or data caps, even during peak hours.
- Global Server Network – 3,200+ servers in 100+ countries, so you can always find a low-latency option nearby.
Quick Recommendation If you're looking for a fast, reliable VPN that supports unlimited devices, strong streaming (Netflix, Disney+, YouTube, etc.), and solid privacy without breaking the bank, Surfshark is one of the best all-rounders right now. Most users get 4K streaming without issues at these speeds.
Surfshark Connection Troubleshooting – Common Issues & Fixes (2026 Update)
If Surfshark won’t connect, it’s usually a quick fix. Different networks (home Wi-Fi, work/school, public hotspots, mobile data) can have unique restrictions, firewalls, or settings that interfere with VPN connections. Here are the four most effective troubleshooting steps I recommend based on real user experiences and my own tests:
- Test on Different Networks First, try connecting to Surfshark on a completely different network:
- Switch from Wi-Fi to mobile data (hotspot)
- Use Ethernet if possible
- Try another Wi-Fi network (e.g., neighbor’s or café)
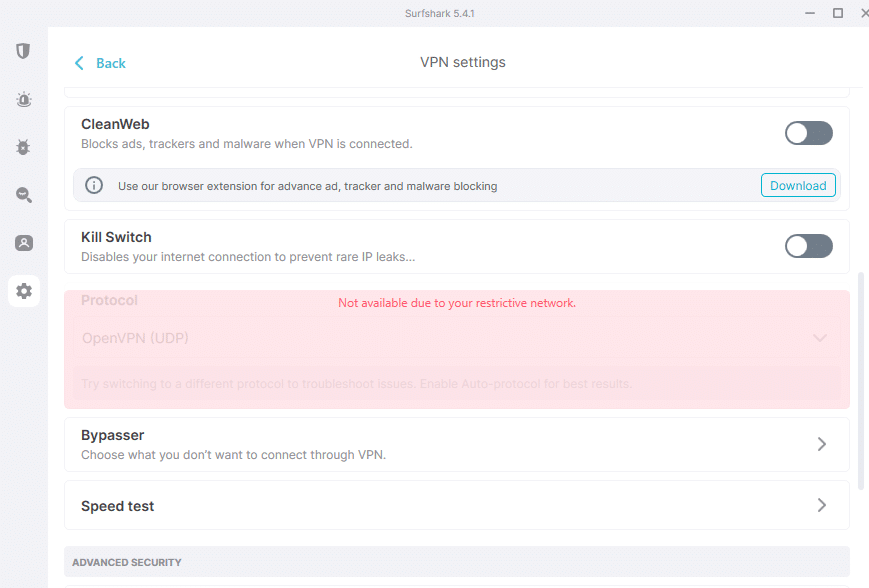
- Change Connection Protocol Surfshark supports multiple protocols — switching can bypass restrictions:
- Open the Surfshark app → Go to Settings → Advanced → Protocol.
- Try these in order:
- WireGuard (fastest & default – best for most users)
- OpenVPN UDP (excellent for bypassing blocks, usually the quickest fix)
- OpenVPN TCP (more reliable on unstable networks)
- IKEv2 (good for mobile data)
- Disable Conflicting Apps Antivirus, other VPNs, firewalls, or security software can interfere:
- Temporarily disable your antivirus (e.g., Windows Defender, Norton, McAfee) or third-party firewall.
- Make sure no other VPN app is running in the background.
- Close apps like ad-blockers or network monitors that might block traffic. Then try reconnecting.
- Update the Surfshark App Outdated versions can cause compatibility issues:
- Go to your device’s app store (Google Play, App Store, or Surfshark website for Windows/macOS).
- Check for Surfshark updates and install the latest version.
- Restart the app (or device) and try connecting again.
If Nothing Works Contact Surfshark support — they offer excellent 24/7 live chat (fast response) and email support. Provide:
- Your device/OS version
- The protocol you tried
- Error messages/screenshots
- Which networks you tested
They can usually resolve issues within minutes.
Final Thoughts Ready to test Surfshark yourself?
Surfshark is one of the most reliable and user-friendly VPNs I’ve used, with unlimited devices, fast speeds, and strong privacy features. If you run into any Surfshark-related questions (setup, speed, features, etc.), feel free to ask in the comments — I’ll do my best to help!
Grab the current deal (up to 81% off + extra months free, unlimited devices included):
Speed and safety checks before choosing
Before buying, compare both performance and risk. A VPN that looks attractive on price can still fail if it drops on public Wi-Fi, uses unclear apps, or cannot keep a stable route during travel.
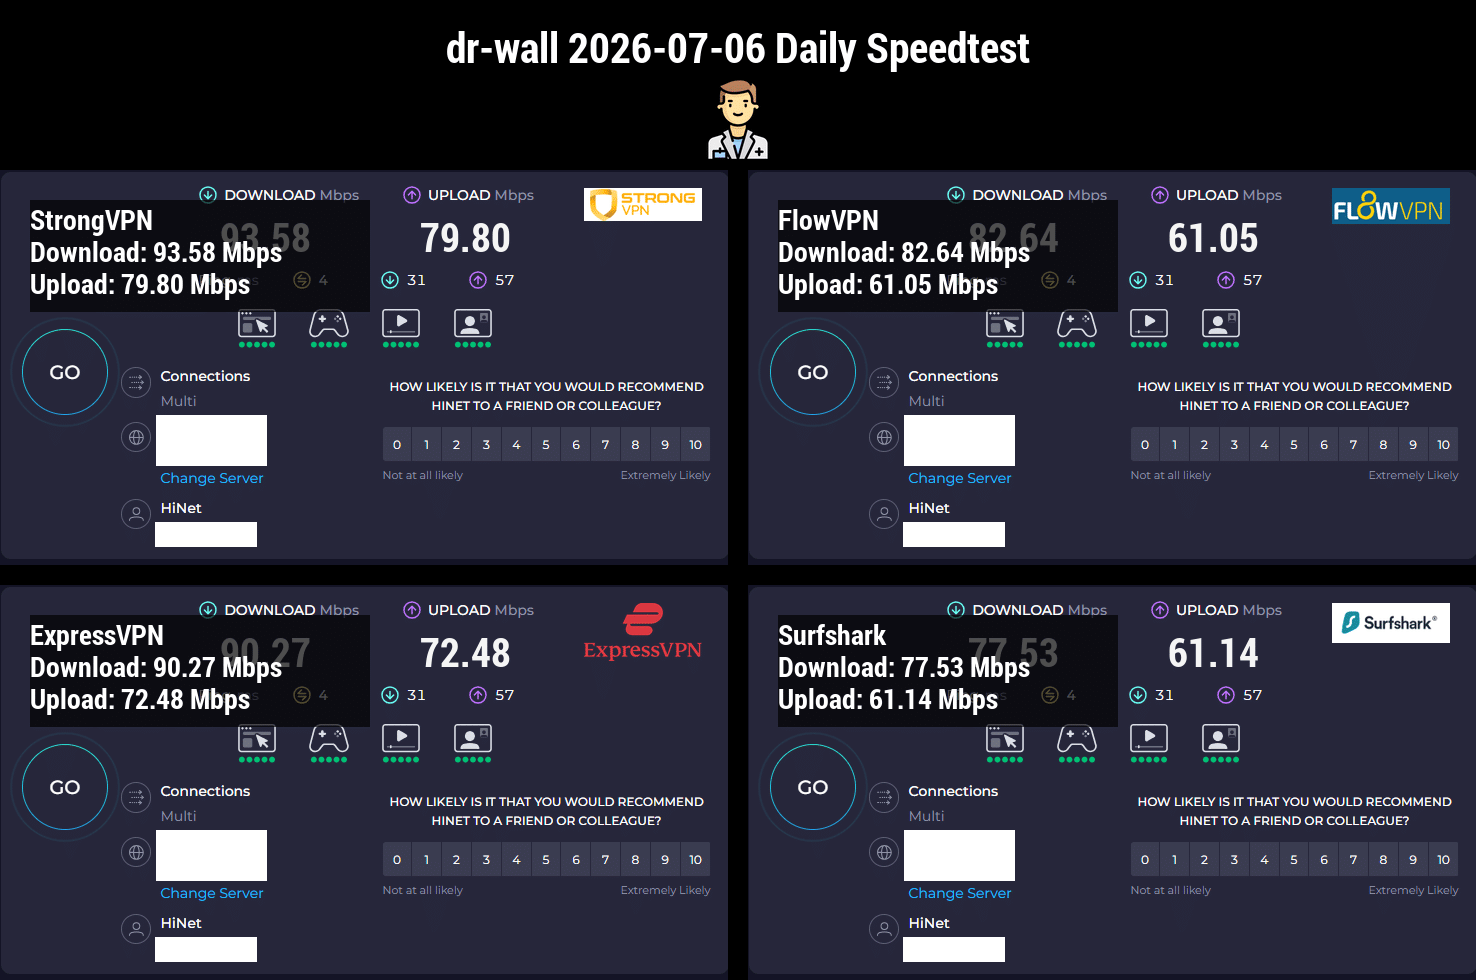
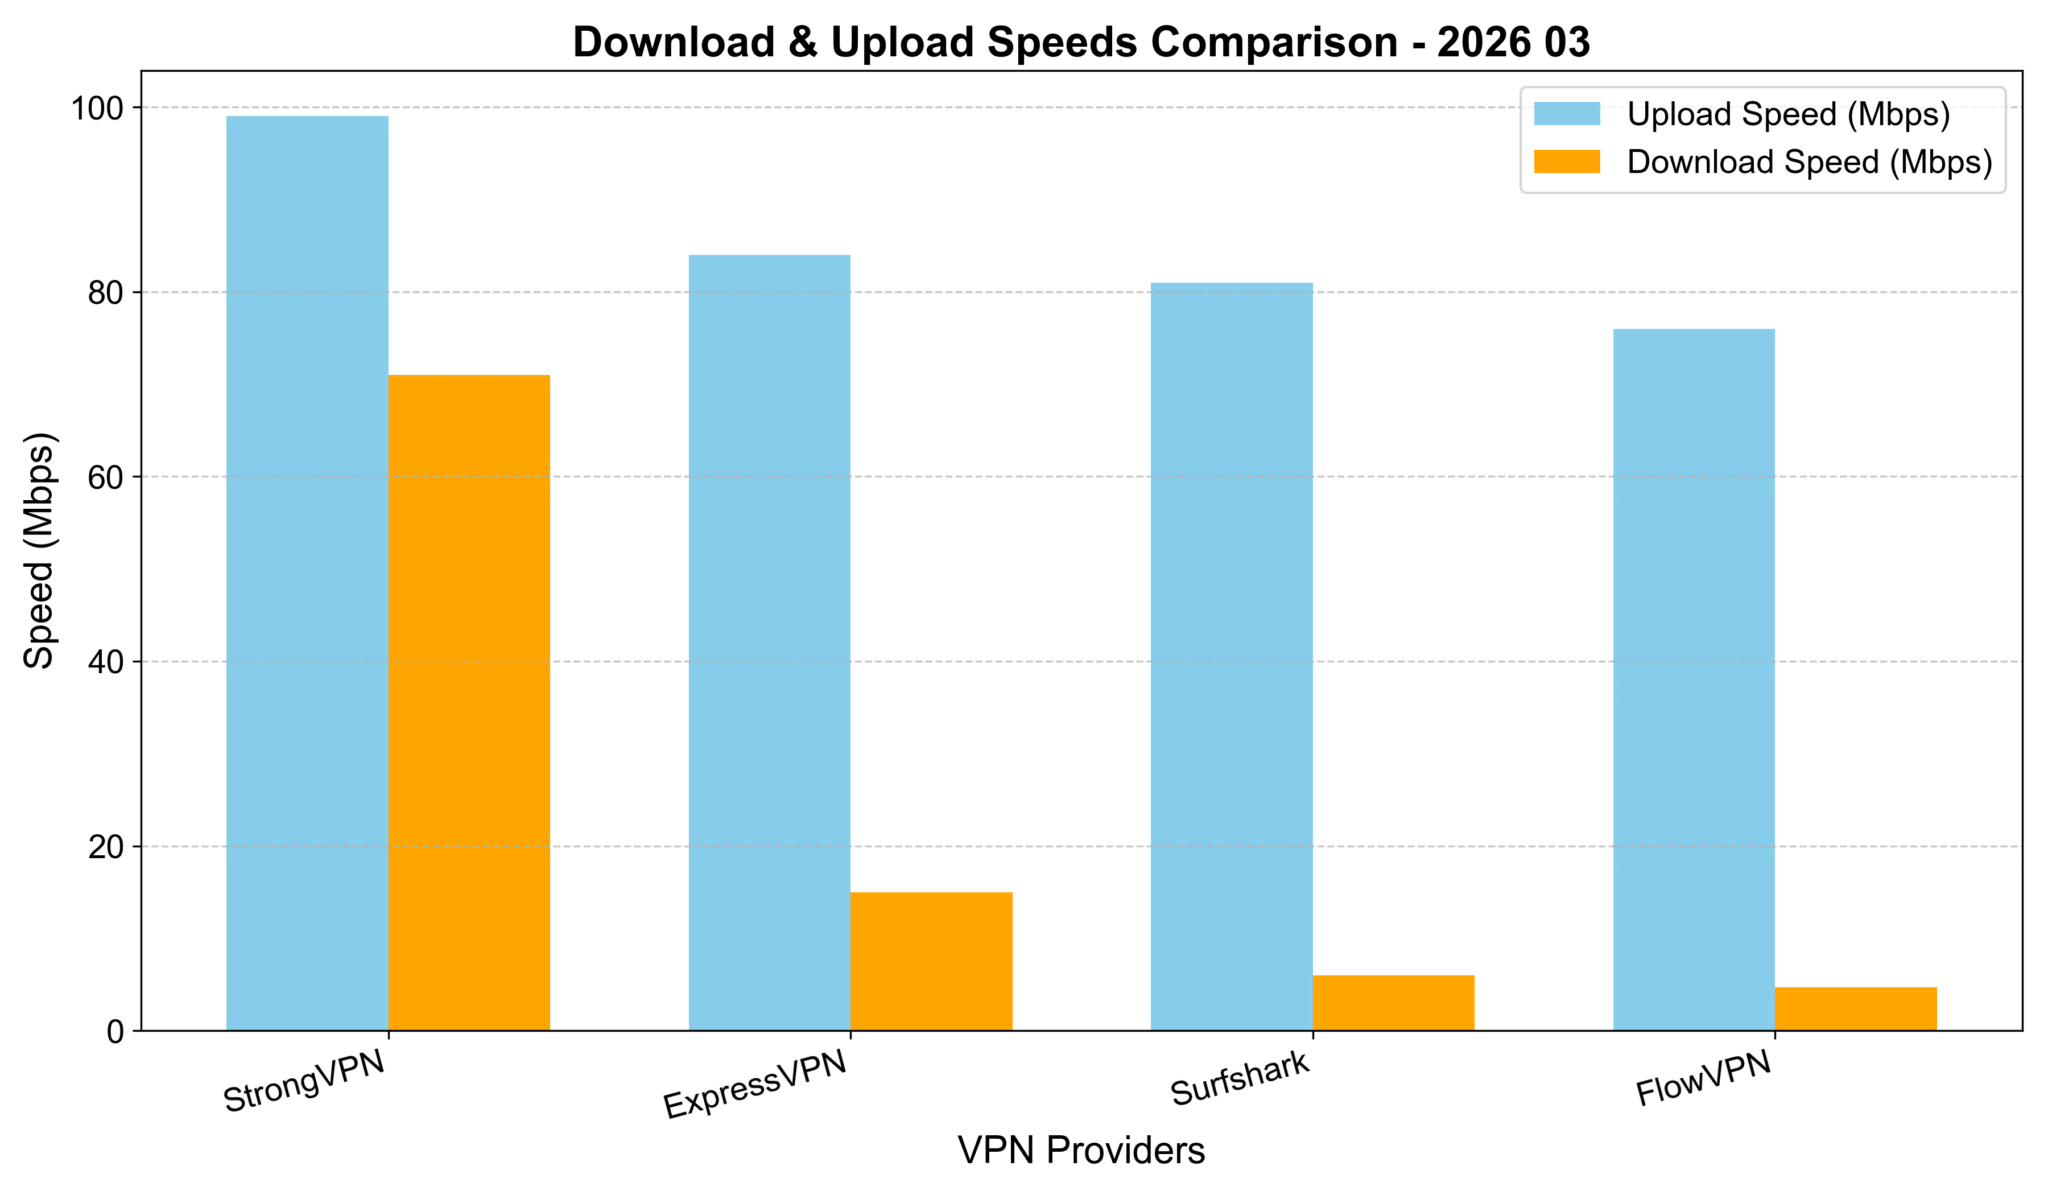
My Speed Tests on These Four VPNs
I tested these four VPNs in real-world browsing and streaming conditions, with routes that are relevant for Asia-Pacific users. Absolute speeds aren't the key factor here—they depend heavily on your local Wi-Fi, mobile data, or ISP baseline. But as you can see from the chart below, StrongVPN delivered the highest download speeds, followed closely by ExpressVPN and Surfshark. The differences were minor (all within about 10% of each other), so they're all solid performers on the same scale.
VPN Testing Methodology – Detailed Report
How to read this test: the numbers are a practical snapshot, not a universal promise. Your own speed will depend on your ISP, Wi-Fi quality, device and chosen server.
- Select VPN Services Chosen based on reputation, features, and user feedback: StrongVPN, ExpressVPN, Surfshark, and others like FlowVPN.
- Choose Test Locations Focused on major cities/regions in Asia (e.g., Tokyo-area equivalents, Hong Kong, Singapore, etc.) for relevant comparisons.
- Testing Tools Used reliable online tools like Speedtest.net and Fast.com to measure download speed, upload speed, and latency.
- Baseline Test Ran speed tests without any VPN connected to establish the baseline internet speed.
- VPN Connection & Testing Connected to each VPN one by one, selecting servers in the target locations, and ran multiple speed tests per service.
- Record & Compare Results Logged download/upload speeds and ping, then compared everything against the baseline.
- Repeat Across Time Slots To ensure accuracy, repeated tests at different times of day (morning, afternoon, evening) over several sessions.
- Compile Report Aggregated the data into charts and summaries, highlighting key findings, methodology, and why certain VPNs edged out in specific scenarios.
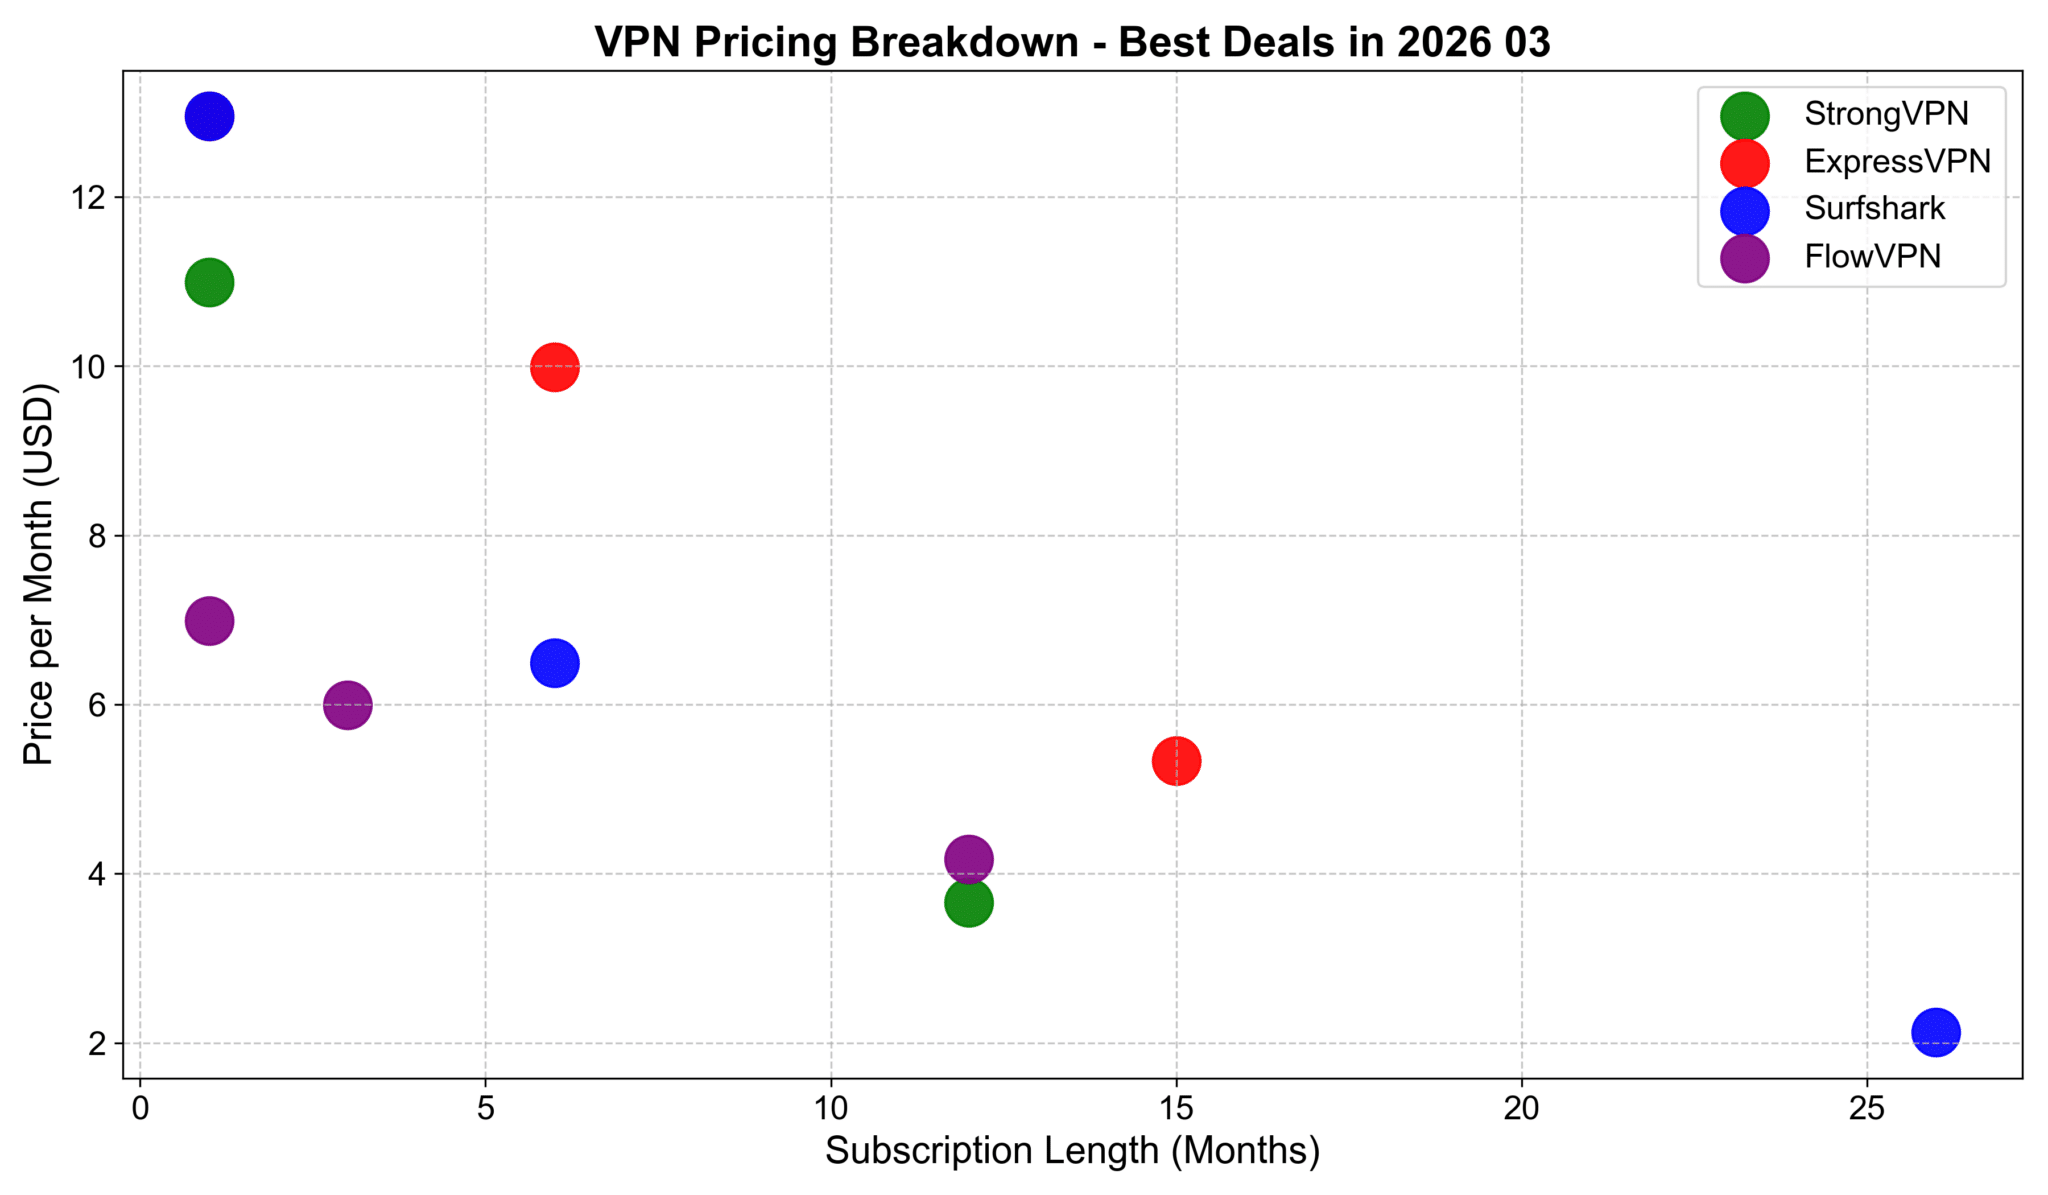
Cheapest VPN Options? Pricing & Speed Breakdown (My Hands-On Tests – March 2026 Update)
I charted pricing by monthly cost (for 1-month vs. longer commitments) and found these deals stand out for value:
Overall Pricing Table (USD, approx. January 2026 rates):
- StrongVPN — 1 month: $10.99 | 12 months: $3.66/mo
- ExpressVPN — 1 month: $12.95 | 6 months: $9.99/mo | 15 months: ~$5.34/mo (or similar long-term)
- Surfshark — 1 month: $12.95 | 6 months: $6.49/mo | 26 months: ~$2.12/mo
- FlowVPN — 1 month: $6.99 | 3 months: $5.99/mo | 12 months: $4.17/mo
Best Deals Summary:
- Cheapest for 1 month: FlowVPN at $6.99/month
- Best for 1-year commitment: StrongVPN at $3.66/month
- Best for 1.5+ years (speed & reliability focus): ExpressVPN around $4.50–5/mo on longer plans
- Best for 2+ years: Surfshark at ~$2.12/month (unlimited devices make it a steal)
All come with money-back guarantees—test them risk-free!
My Speed Comparison to Asia Regions (February 2026 Update – Avg. 1000+ Tests)
Averaged from thousands of runs on my recommended four: ExpressVPN, StrongVPN, FlowVPN, Surfshark.
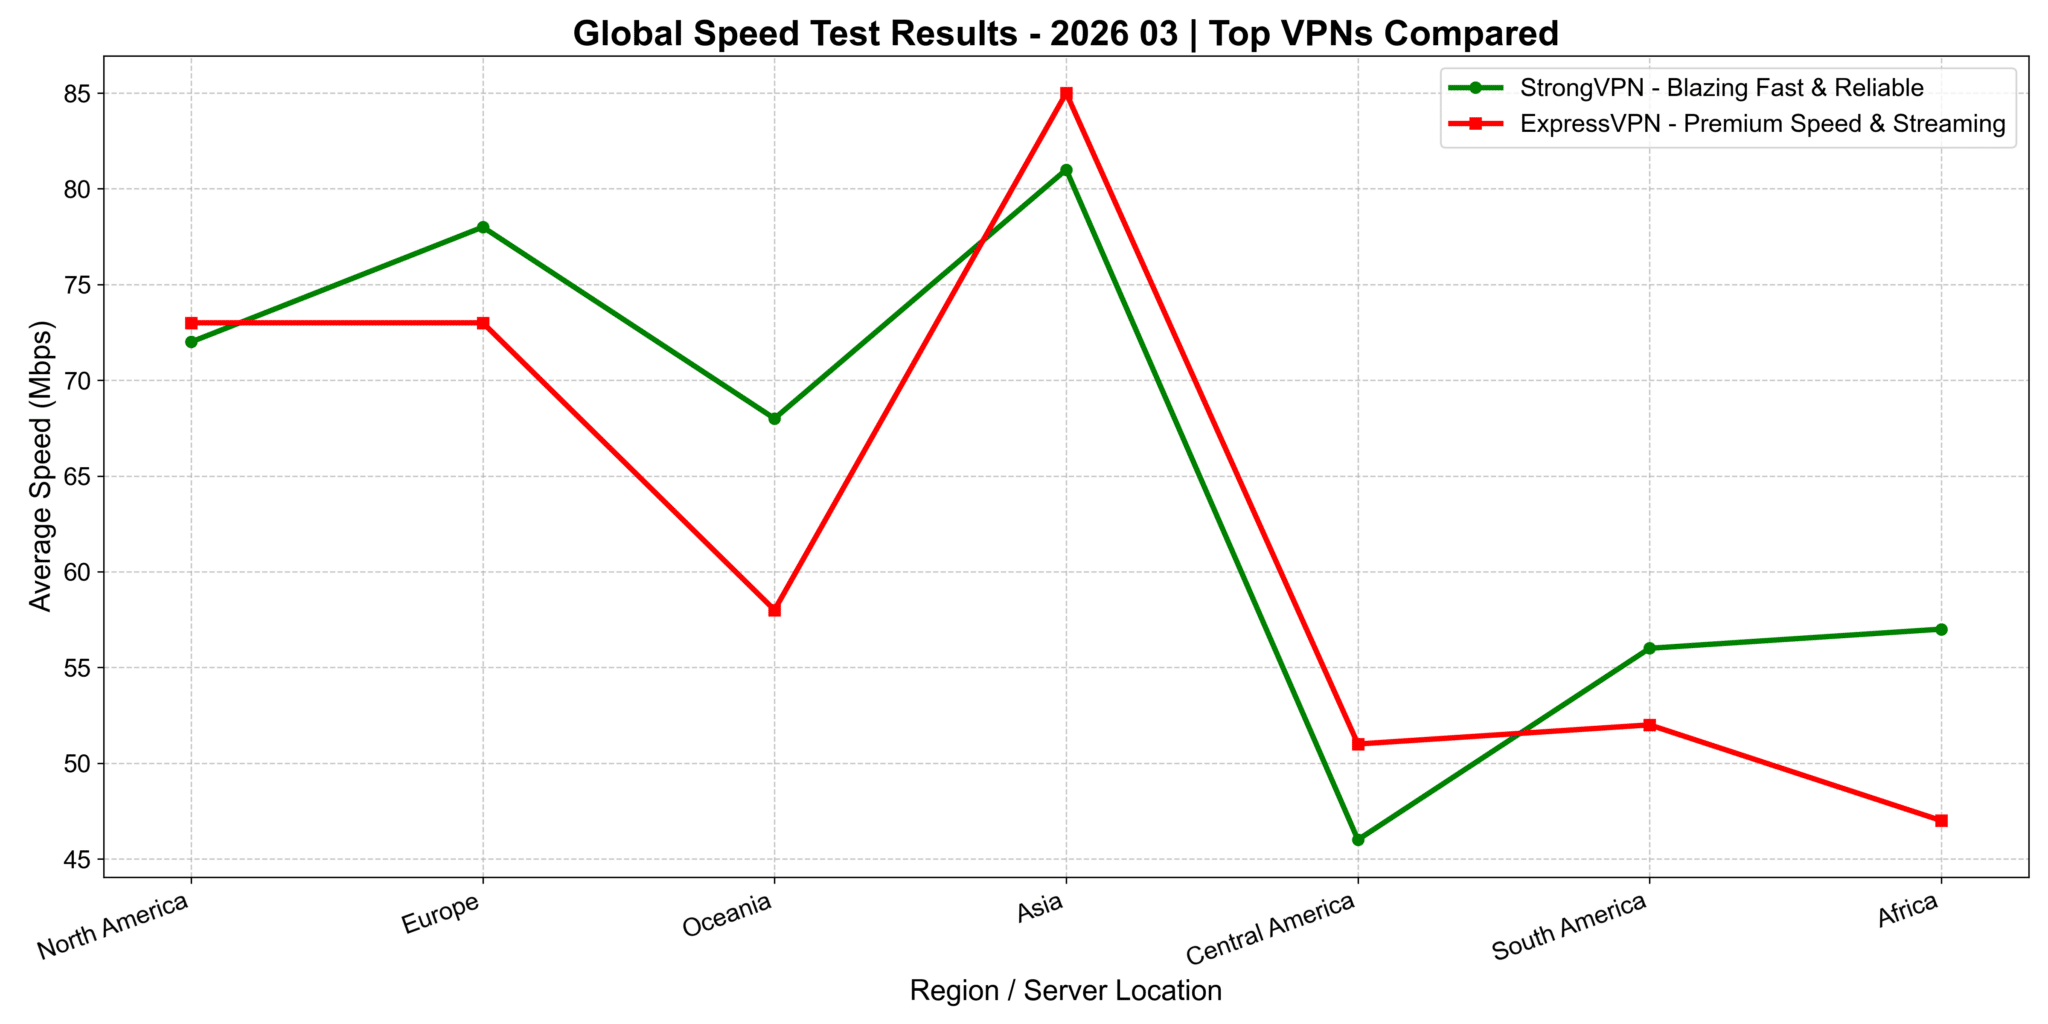
StrongVPN vs. ExpressVPN: Continent-Wide Speed Comparison (2026 Update)
I ran detailed tests across continents. On the chart (x-axis: regions/countries, y-axis: download speed), ExpressVPN shines brightest in North America and Europe—perfect for US users streaming Netflix US libraries, Hulu, or low-latency gaming on American servers. In Asia regions, StrongVPN pulls ahead with noticeably better speeds. The exact reason? Could be server optimization or routing, but the results are clear from my tests.
Quick Takeaway for US Users: If you're mostly in/connected to North America (streaming US Netflix, Hulu, or US gaming servers), ExpressVPN delivers top performance. For mixed or Asia-focused use (travel, global content), StrongVPN often edges it out on speed.
Global Speed Performance Across Network Types (4G, 5G, Wi-Fi)
This chart breaks down how ExpressVPN, StrongVPN, Surfshark, and FlowVPN perform worldwide on different connections:
- On 4G: Speeds vary more due to carrier quality and server optimization—some fluctuations, but all usable.
- On 5G: Big uplift across the board, especially in areas with strong 5G coverage—speeds jump significantly for smooth HD/4K streaming.
- On Wi-Fi: Results depend heavily on your home/office broadband. In strong Wi-Fi spots, speeds often beat mobile networks.
Great for commuters, travelers, or anyone switching between networks.
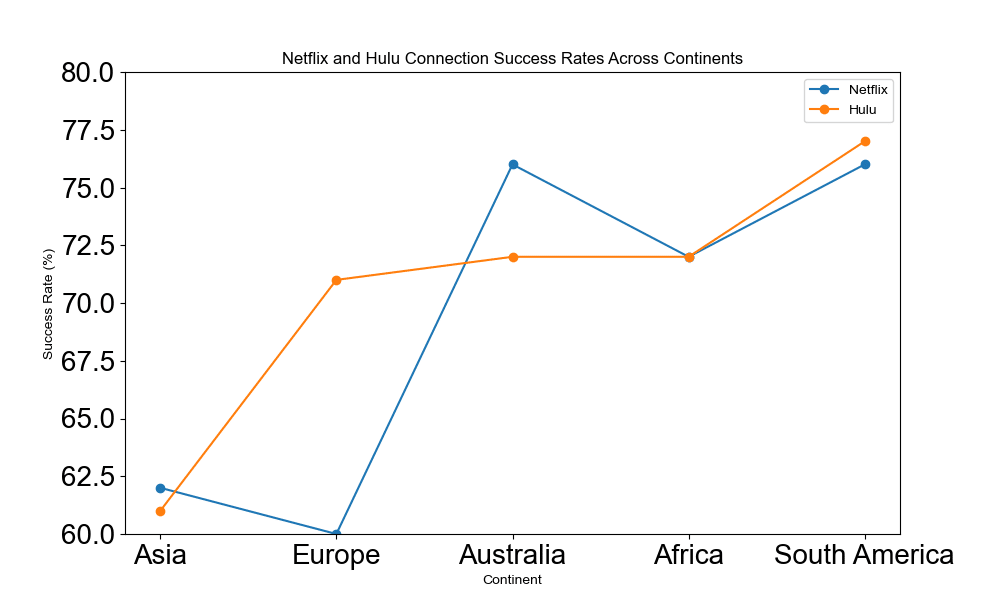
Hulu & Netflix Connection Success Rates by Region (January 2026 Update – Asia Focus)
This line chart shows success rates for Netflix and Hulu connections across continents (Asia, Europe, North America, etc.), with rates typically 60–80%+ on tested servers. Different colors/lines distinguish Netflix vs. Hulu for easy comparison.
Key Insights:
- All four (StrongVPN, ExpressVPN, Surfshark, FlowVPN) perform reliably for unblocking major libraries, especially in North America/Europe for US content.
- Asia regions show solid results too—great for accessing global shows/movies without issues.
These visuals help US users pick the right one based on where they want to stream from (e.g., US Hulu/Netflix libraries or international options while traveling).
VPNs and Proxy Apps We Would Treat Carefully
Some VPN and proxy apps create more risk than they solve. The main warning signs are unclear ownership, weak privacy practices, unstable apps, aggressive permissions, poor refund support and reports of real IP exposure.
| Risk signal | Why it matters | Safer move |
|---|---|---|
| Unknown company or unclear jurisdiction | You may not know who controls your traffic, logs or payment data. | Choose a provider with public policies, support channels and refund terms. |
| Free VPN with aggressive ads | Free services often need another way to make money, and that can create privacy tradeoffs. | Use a paid VPN with a trial or money-back window instead. |
| Cracked APK, unofficial installer or copied app | Modified installers can include tracking, malware or account theft risk. | Download only from the official site or official app store. |
| No refund path or no support response | If the app stops working, you may have no practical way to recover the payment. | Test before a long plan and keep screenshots of refund terms. |
For most readers, the safer path is boring but practical: use a known paid VPN, test it on your own network, keep one backup option, and avoid apps that ask for too many permissions without explaining why.